Khi chạy debug mode 64 bit với các dll 64bit sẽ có thể gặp lỗi BadImageException.
Nguyên nhân là do IIS Express chưa được chỉnh chạy theo chế độ 64 bit.
Để khắc phục vào Tools -> Options -> Project and Solutions -> Web Projects -> Use the 64 bit version of IIS Express
Sunday, September 24, 2017

Thursday, August 17, 2017
Lưu ý khi kết nối C# Oracle
Khi kết nối Oracle dùng C#, nếu dùng ODP.NET để kết nối thì phải lưu ý download đúng bộ dll ứng với phiên bản Oracle.
Nếu dùng Oracle 11g thì cần download đúng bộ dành cho 11g tại
http://www.oracle.com/technetwork/database/windows/downloads/index-090165.html (64bit)
http://www.oracle.com/technetwork/database/windows/downloads/utilsoft-087491.html(32bit)
Nếu dùng Oracle 11g thì cần download đúng bộ dành cho 11g tại
http://www.oracle.com/technetwork/database/windows/downloads/index-090165.html (64bit)
http://www.oracle.com/technetwork/database/windows/downloads/utilsoft-087491.html(32bit)
Monday, June 26, 2017
Cách add thư viện jar vào Android Studio
Sau đây là các bước để add 1 thư việc jar vào Android Studio.


Bước 1: Chọn Project Files
Bước 2: Click phải vào libs, chọn "Show in Explorer" để mở thư mục này trên Windows Explorer
Bước 3: Copy file jar bỏ vào thư mục libs
Bước 4: Refesh lại thư mục libs trong Android Studio, click chuột phải vào thư việc jar, chọn "Add as Library"
Sunday, June 18, 2017
Xử lý lỗi Exception in thread "main" java.lang.NullPointerException khi chạy gen stub cho ksoap2
Khi chạy lệnh java -cp ksoap2-generating-stub-0.1-SNAPSHOT-jar-with-dependencies.jar;"%JAVA_HOME%\lib\tools.jar" ksoap2.generator.Wsdl2Android -w "http://localhost:8080/Ws2Ksoap/services/HelloWorld?wsdl" -g .\generated để tạo các file interface cho ksoap 2 mà bị lỗi Exception in thread "main" java.lang.NullPointerException thì cách xử lý như sau:
Thay vì gõ java, cần gõ full đường dẫn đến file java.exe của JDK, vd:
"C:\Program Files (x86)\Java\jdk1.8.0_131\bin\java.exe" -cp ksoap2-generating-stub-0.1-SNAPSHOT-jar-with-dependencies.jar;"%JAVA_HOME%\lib\tools.jar" ksoap2.generator.Wsdl2Android -w "http://localhost:8080/Ws2Ksoap/services/HelloWorld?wsdl" -g .\generated
Thay vì gõ java, cần gõ full đường dẫn đến file java.exe của JDK, vd:
"C:\Program Files (x86)\Java\jdk1.8.0_131\bin\java.exe" -cp ksoap2-generating-stub-0.1-SNAPSHOT-jar-with-dependencies.jar;"%JAVA_HOME%\lib\tools.jar" ksoap2.generator.Wsdl2Android -w "http://localhost:8080/Ws2Ksoap/services/HelloWorld?wsdl" -g .\generated
Wednesday, March 01, 2017
Xử lý khi Oracle password bị expired
Khi gặp lỗi mật khẩu bị expire, có thể tham khảo cách làm dưới
https://hecpv.wordpress.com/2014/10/16/how-to-solve-ora-28001-the-password-has-expired/
The other day I was happily opening SQL Developer when I found this horrible thing.
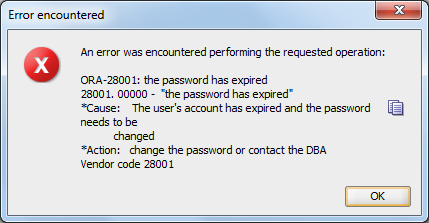
Here is how to solve it.
- Connect as sysdba to the database.
C:\Users\Siry>sqlplus / as sysdba
- Run the query to set the password’s life time to unlimited.
SQL> ALTER PROFILE DEFAULT LIMIT PASSWORD_LIFE_TIME UNLIMITED;
Profile altered.
- Set a password for the locked user.
SQL> ALTER USER user_name IDENTIFIED BY password;
User altered.
- Unlock the user account.
SQL> ALTER USER user_name ACCOUNT UNLOCK;
User altered.
- Make sure your user is not locked anymore.
SQL> SELECT USERNAME,ACCOUNT_STATUS FROM DBA_USERS;
USERNAME ACCOUNT_STATUS
------------------------------ --------------------------------
HR                             OPEN
ANONYMOUS                      OPEN
APEX_040000                    LOCKED
FLOWS_FILES                    LOCKED
XDB                            EXPIRED & LOCKED
CTXSYS                         EXPIRED & LOCKED
MDSYS                          EXPIRED & LOCKED
SYSTEM                         OPEN
SYS                            OPEN
user_name                      OPEN
SIRY                           OPEN

USERNAME ACCOUNT_STATUS
------------------------------ --------------------------------
APEX_PUBLIC_USER               LOCKED
XS$NULL                        EXPIRED & LOCKED
OUTLN                          EXPIRED & LOCKED

15 rows selected.
Remember that all the text in Italics represents variables and should be replaced with your own values.
Please note that this may NOT be the best option for you specially if you are not using your database only for development/testing which is my case. I do not recommend to do this in a production environment.
Thursday, February 09, 2017
Xử lý sự cố kết nối vào Oracle bị lâu
Nếu có 1 ngày sử dụng Sql Developer hoặc kết nối software client vào Oracle mất rất lâu mới được thì phần lớn là do file listerner.log quá lớn ~ 4GB
Cách xử lý là stop service listener. Vào thư mục cài đặt Oracle, tìm kiếm file listener.log. Xóa đi hoặc đổi tên. Sau đó start lại là xong.
Cách xử lý này được tham khảo theo bài viết bên dưới
https://vjdba.wordpress.com/2013/09/24/93/
Cách xử lý là stop service listener. Vào thư mục cài đặt Oracle, tìm kiếm file listener.log. Xóa đi hoặc đổi tên. Sau đó start lại là xong.
Cách xử lý này được tham khảo theo bài viết bên dưới
https://vjdba.wordpress.com/2013/09/24/93/
Tuesday, December 27, 2016
Cách gọi Store trong Oracle
SET SERVEROUTPUT ON; -- Dòng này dùng để output ra console
BEGIN
TEMP_PROC();
--rollback;
END;
BEGIN
TEMP_PROC();
--rollback;
END;
Monday, September 05, 2016
Tạo bảng trong Oracle
Source: https://chartio.com/resources/tutorials/how-to-define-an-auto-increment-primary-key-in-oracle
Much to the frustration of database administrators worldwide, prior to Oracle version 12c in mid-2014, Oracle simply had no inherent ability to inherently generate auto incrementing columns within a table schema. While the reasons for this design decision can only be guessed at, the good news is that even for users on older Oracle systems, there is a possible workaround to circumnavigate this pitfall and create your own auto incremented primary key column.
Creating a Sequence
The first step is to create a
SEQUENCE in your database, which is a data object that multiple users can access to automatically generate incremented values. As discussed in the documentation, a sequence in Oracle prevents duplicate values from being created simultaneously because multiple users are effectively forced to "take turns" before each sequential item is generated.
For the purposes of creating a unique primary key for a new table, first we must
CREATE the table we'll be using:CREATE TABLE books ( id NUMBER(10) NOT NULL, title VARCHAR2(100) NOT NULL );
Next we need to add a
PRIMARY KEY constraint:ALTER TABLE books ADD ( CONSTRAINT books_pk PRIMARY KEY (id) );
Finally, we'll create our
SEQUENCE that will be utilized later to actually generate the unique, auto incremented value.CREATE SEQUENCE books_sequence;
Adding a Trigger
While we have our table created and ready to go, our sequence is thus far just sitting there but never being put to use. This is where
TRIGGERS come in.
Similar to an
event in modern programming languages, a TRIGGER in Oracle is a stored procedure that is executed when a particular event occurs.
Typically a
TRIGGER will be configured to fire when a table is updated or a record is deleted, providing a bit of cleanup when necessary.
In our case, we want to execute our
TRIGGER prior to INSERT into our books table, ensuring ourSEQUENCE is incremented and that new value is passed onto our primary key column.CREATE OR REPLACE TRIGGER books_on_insert BEFORE INSERT ON books FOR EACH ROW BEGIN SELECT books_sequence.nextval INTO :new.id FROM dual; END;
Here we are creating (or replacing if it exists) the
TRIGGER named books_on_insert and specifying that we want the trigger to fire BEFORE INSERT occurs for the books table, and to be applicable to any and all rows therein.
The 'code' of the trigger itself is fairly simple: We
SELECT the next incremental value from our previously created books_sequence SEQUENCE, and inserting that into the :new record of the books table in the specified .id field.
Note: The
FROM dual part is necessary to complete a proper query but is effectively irrelevant. The dualtable is just a single dummy row of data and is added, in this case, just so it can be ignored and we can instead execute the system function of our trigger rather than returning data of some kind.IDENTITY Columns
IDENTITY columns were introduced in Oracle 12c, allowing for simple auto increment functionality in modern versions of Oracle.
Using the
IDENTITY column is functionally similar to that of other database systems. Recreating our above books table schema in modern Oracle 12c or higher, we'd simply use the following column definition.CREATE TABLE books ( id NUMBER GENERATED BY DEFAULT ON NULL AS IDENTITY, title VARCHAR2(100) NOT NULL );
Monday, February 15, 2016
Cách chuyển tiếng Việt có dấu thành không dấu nhanh, gọn, lẹ
Sử dụng RegularExpression, ta có thể khử dấu tiếng Việt một cách nhanh, gọn, lẹ như sau:
public static string convertToUnSign3(string s)
{
Regex regex = new Regex("\\p{IsCombiningDiacriticalMarks}+");
string temp = s.Normalize(NormalizationForm.FormD);
return regex.Replace(temp, String.Empty).Replace('\u0111', 'd').Replace('\u0110', 'D');
}
Sunday, February 14, 2016
Cách zip file trong C#
Làm các bước sau để tạo file zip
B1: Tải dll Ionic.Zip từ (Lên google search ra)
B2: Giải nén, add dll từ đường dẫn: \DotNetZipLib-DevKit-v1.9\zip-v1.9\Debug\Ionic.Zip.dll
B3: Trong hàm Main, add đoạn code
using (ZipFile zip = new ZipFile())
{
zip.Password = "123";
zip.AddFile("Book1.xls");
zip.AddFile("Book2.xls");
zip.Save("Backup.zip");
}
B1: Tải dll Ionic.Zip từ (Lên google search ra)
B2: Giải nén, add dll từ đường dẫn: \DotNetZipLib-DevKit-v1.9\zip-v1.9\Debug\Ionic.Zip.dll
B3: Trong hàm Main, add đoạn code
using (ZipFile zip = new ZipFile())
{
zip.Password = "123";
zip.AddFile("Book1.xls");
zip.AddFile("Book2.xls");
zip.Save("Backup.zip");
}
Tuesday, February 02, 2016
Sending WebDAV Requests in .NET
Earlier today one of my coworkers, John Bocharov, asked me if I had ever done any WebDAV coding in .NET - specifically sending PUT and DELETE requests. I replied that I had, but it had been several months ago, and each time that I had written any WebDAV-related code samples it was for a specific purpose and not very exhaustive. Just the same, I promised John that if I found any of my old code samples I would send them to him. After a bit of searching through my archives I was able to find enough code snippets to throw together a quick sample for PUT and DELETE that John could use, but it made me start thinking about putting together a more complete sample by adding a few extra WebDAV methods, thereby creating a better example to keep around.
With that in mind, the code sample in this blog post shows how to send several of the most-common WebDAV requests using C# and common .NET libraries. There's a bit of intentional redundancies in each section of the sample - I did this because I was trying to make each section somewhat self-sufficient so you can copy and paste a little easier. I present the WebDAV methods the in the following order:
| WebDAV Method | Notes |
|---|---|
| PUT | This section of the sample writes a string as a text file to the destination server as "foobar1.txt". Sending a raw string is only one way of writing data to the server, in a more common scenario you would probably open a file using a steam object and write it to the destination. One thing to note in this section of the sample is the addition of the "Overwrite" header, which specifies that the destination file can be overwritten. |
| COPY | This section of the sample copies the file from "foobar1.txt" to "foobar2.txt", and uses the "Overwrite" header to specify that the destination file can be overwritten. One thing to note in this section of the sample is the addition of the "Destination" header, which obviously specifies the destination URL. The value for this header can be a relative path or an FQDN, but it may not be an FQDN to a different server. |
| MOVE | This section of the sample moves the file from "foobar2.txt" to "foobar1.txt", thereby replacing the original uploaded file. As with the previous two sections of the sample, this section of the sample uses the "Overwrite" and "Destination" headers. |
| GET | This section of the sample sends a WebDAV-specific form of the HTTP GET method to retrieve the source code for the destination URL. This is accomplished by sending the "Translate: F" header and value, which instructs IIS to send the source code instead of the processed URL. In this specific sample I am only using text files, but if the requests were for ASP.NET or PHP files you would need to specify the "Translate: F" header/value pair in order to retrieve the source code. |
| DELETE | This section of the sample deletes the original file, thereby cleaning off all of the sample files from the destination server. |
| MKCOL | This section of the sample creates a folder named "foobar3" on the destination server; as far as WebDAV on IIS is concerned, the MKCOL method is a lot like the old DOS MKDIR command. |
| DELETE | This section of the sample deletes the folder from the destination server. |
That wraps up the section descriptions, and with that taken care of - here is the code sample:
using System;
using System.Net;
using System.IO;
using System.Text;

class WebDavTest
{
   static void Main(string[] args)
   {
      try
      {
         // Define the URLs.
         string szURL1 = @"http://localhost/foobar1.txt";
         string szURL2 = @"http://localhost/foobar2.txt";
         string szURL3 = @"http://localhost/foobar3";

         // Some sample text to put in text file.
         string szContent = String.Format(
            @"Date/Time: {0} {1}",
            DateTime.Now.ToShortDateString(),
            DateTime.Now.ToLongTimeString());

         // Define username and password strings.
         string szUsername = @"username";
         string szPassword = @"password";

         // --------------- PUT REQUEST --------------- //

         // Create an HTTP request for the URL.
         HttpWebRequest httpPutRequest =
            (HttpWebRequest)WebRequest.Create(szURL1);

         // Set up new credentials.
         httpPutRequest.Credentials =
            new NetworkCredential(szUsername, szPassword);

         // Pre-authenticate the request.
         httpPutRequest.PreAuthenticate = true;

         // Define the HTTP method.
         httpPutRequest.Method = @"PUT";

         // Specify that overwriting the destination is allowed.
         httpPutRequest.Headers.Add(@"Overwrite", @"T");

         // Specify the content length.
         httpPutRequest.ContentLength = szContent.Length;

         // Optional, but allows for larger files.
         httpPutRequest.SendChunked = true;

         // Retrieve the request stream.
         Stream requestStream =
            httpPutRequest.GetRequestStream();

         // Write the string to the destination as a text file.
         requestStream.Write(
            Encoding.UTF8.GetBytes((string)szContent),
            0, szContent.Length);

         // Close the request stream.
         requestStream.Close();

         // Retrieve the response.
         HttpWebResponse httpPutResponse =
            (HttpWebResponse)httpPutRequest.GetResponse();

         // Write the response status to the console.
         Console.WriteLine(@"PUT Response: {0}",
            httpPutResponse.StatusDescription);

         // --------------- COPY REQUEST --------------- //

         // Create an HTTP request for the URL.
         HttpWebRequest httpCopyRequest =
            (HttpWebRequest)WebRequest.Create(szURL1);

         // Set up new credentials.
         httpCopyRequest.Credentials =
            new NetworkCredential(szUsername, szPassword);

         // Pre-authenticate the request.
         httpCopyRequest.PreAuthenticate = true;

         // Define the HTTP method.
         httpCopyRequest.Method = @"COPY";

         // Specify the destination URL.
         httpCopyRequest.Headers.Add(@"Destination", szURL2);

         // Specify that overwriting the destination is allowed.
         httpCopyRequest.Headers.Add(@"Overwrite", @"T");

         // Retrieve the response.
         HttpWebResponse httpCopyResponse =
            (HttpWebResponse)httpCopyRequest.GetResponse();

         // Write the response status to the console.
         Console.WriteLine(@"COPY Response: {0}",
            httpCopyResponse.StatusDescription);

         // --------------- MOVE REQUEST --------------- //

         // Create an HTTP request for the URL.
         HttpWebRequest httpMoveRequest =
            (HttpWebRequest)WebRequest.Create(szURL2);

         // Set up new credentials.
         httpMoveRequest.Credentials =
            new NetworkCredential(szUsername, szPassword);

         // Pre-authenticate the request.
         httpMoveRequest.PreAuthenticate = true;

         // Define the HTTP method.
         httpMoveRequest.Method = @"MOVE";

         // Specify the destination URL.
         httpMoveRequest.Headers.Add(@"Destination", szURL1);

         // Specify that overwriting the destination is allowed.
         httpMoveRequest.Headers.Add(@"Overwrite", @"T");

         // Retrieve the response.
         HttpWebResponse httpMoveResponse =
            (HttpWebResponse)httpMoveRequest.GetResponse();

         // Write the response status to the console.
         Console.WriteLine(@"MOVE Response: {0}",
            httpMoveResponse.StatusDescription);

         // --------------- GET REQUEST --------------- //

         // Create an HTTP request for the URL.
         HttpWebRequest httpGetRequest =
            (HttpWebRequest)WebRequest.Create(szURL1);

         // Set up new credentials.
         httpGetRequest.Credentials =
            new NetworkCredential(szUsername, szPassword);

         // Pre-authenticate the request.
         httpGetRequest.PreAuthenticate = true;

         // Define the HTTP method.
         httpGetRequest.Method = @"GET";

         // Specify the request for source code.
         httpGetRequest.Headers.Add(@"Translate", "F");

         // Retrieve the response.
         HttpWebResponse httpGetResponse =
            (HttpWebResponse)httpGetRequest.GetResponse();

         // Retrieve the response stream.
         Stream responseStream =
            httpGetResponse.GetResponseStream();

         // Retrieve the response length.
         long responseLength =
            httpGetResponse.ContentLength;

         // Create a stream reader for the response.
         StreamReader streamReader =
            new StreamReader(responseStream, Encoding.UTF8);

         // Write the response status to the console.
         Console.WriteLine(
            @"GET Response: {0}",
            httpGetResponse.StatusDescription);
         Console.WriteLine(
            @"  Response Length: {0}",
            responseLength);
         Console.WriteLine(
            @"  Response Text: {0}",
            streamReader.ReadToEnd());

         // Close the response streams.
         streamReader.Close();
         responseStream.Close();

         // --------------- DELETE REQUEST --------------- //

         // Create an HTTP request for the URL.
         HttpWebRequest httpDeleteFileRequest =
            (HttpWebRequest)WebRequest.Create(szURL1);

         // Set up new credentials.
         httpDeleteFileRequest.Credentials =
            new NetworkCredential(szUsername, szPassword);

         // Pre-authenticate the request.
         httpDeleteFileRequest.PreAuthenticate = true;

         // Define the HTTP method.
         httpDeleteFileRequest.Method = @"DELETE";

         // Retrieve the response.
         HttpWebResponse httpDeleteFileResponse =
            (HttpWebResponse)httpDeleteFileRequest.GetResponse();

         // Write the response status to the console.
         Console.WriteLine(@"DELETE Response: {0}",
            httpDeleteFileResponse.StatusDescription);

         // --------------- MKCOL REQUEST --------------- //

         // Create an HTTP request for the URL.
         HttpWebRequest httpMkColRequest =
            (HttpWebRequest)WebRequest.Create(szURL3);

         // Set up new credentials.
         httpMkColRequest.Credentials =
            new NetworkCredential(szUsername, szPassword);

         // Pre-authenticate the request.
         httpMkColRequest.PreAuthenticate = true;

         // Define the HTTP method.
         httpMkColRequest.Method = @"MKCOL";

         // Retrieve the response.
         HttpWebResponse httpMkColResponse =
            (HttpWebResponse)httpMkColRequest.GetResponse();

         // Write the response status to the console.
         Console.WriteLine(@"MKCOL Response: {0}",
            httpMkColResponse.StatusDescription);

         // --------------- DELETE REQUEST --------------- //

         // Create an HTTP request for the URL.
         HttpWebRequest httpDeleteFolderRequest =
            (HttpWebRequest)WebRequest.Create(szURL3);

         // Set up new credentials.
         httpDeleteFolderRequest.Credentials =
            new NetworkCredential(szUsername, szPassword);

         // Pre-authenticate the request.
         httpDeleteFolderRequest.PreAuthenticate = true;

         // Define the HTTP method.
         httpDeleteFolderRequest.Method = @"DELETE";

         // Retrieve the response.
         HttpWebResponse httpDeleteFolderResponse =
            (HttpWebResponse)httpDeleteFolderRequest.GetResponse();

         // Write the response status to the console.
         Console.WriteLine(@"DELETE Response: {0}",
            httpDeleteFolderResponse.StatusDescription);

      }
      catch (Exception ex)
      {
         Console.WriteLine(ex.Message);
      }
   }
}
When you run the code sample, if there are no errors you should see something like the following output:
Since the code sample cleans up after itself, you should not see any files or folders on the destination server when it has completed executing. To see the files and folders actually created and deleted on the destination server, you can step through the code in a debugger.
Closing Notes
I should point out that I did not include examples of the WebDAV PROPPATCH/PROPFIND and LOCK/UNLOCK methods in this sample because they require processing the XML responses, and that was way outside the scope of what I had originally wanted to do with this sample. I might write a follow-up blog later that shows how to use those methods, but I'm not making any promises. ;-]
I hope this helps.
Friday, January 29, 2016
Cách bypass gọi SSL trong .NET
Khi code .NET, nếu có gọi web service có https, cần bổ sung đoạn code sau để bypass SSL
ServicePointManager.ServerCertificateValidationCallback = delegate { return true; };
Có nhiều cách hơn nhưng cách trên là ngắn gọn.
Nguồn tham khảo: http://dejanstojanovic.net/aspnet/2014/september/bypass-ssl-certificate-validation/
ServicePointManager.ServerCertificateValidationCallback = delegate { return true; };
Có nhiều cách hơn nhưng cách trên là ngắn gọn.
Nguồn tham khảo: http://dejanstojanovic.net/aspnet/2014/september/bypass-ssl-certificate-validation/
Monday, May 28, 2012
ADO.NET Entity framework advanced scenarios: Working with stored procedures that return multiple resultsets
Trích từ bài viết: http://blogs.infosupport.com/ado-net-entity-framework-advanced-scenarios-working-with-stored-procedures-that-return-multiple-resultsets/
Today I got an interesting question about stored procedures that return multiple resultsets in combination with ADO.NET entity framework. During the CTP phase this was broken at some point and the previous version of the entity framework didn’t support it at all. But as it turns out, it’s supported now and a pretty cool feature if you ask me.
In this post I will show you how to use stored procedures with multiple resultsets to return a full object graph. I will also show you some of the pitfalls that you may encounter with this scenario.
OVERVIEW OF THE SCENARIO
The scenario for this post is the database model of the recipe browser that you can find on CodePlex. It’s a sample application written in Silverlight with RIA services as a backend. The database contains recipes, that has multiple ingredients. Each of the ingredients can be expressed as a “thing” from which you need an x amount in the recipe. The table structure that I will be talking about in this post is shown below.

In this scenario I will be showing you a stored procedure that returns a single recipe with its ingredients, units and the categories the recipe is part of.
CREATING THE STORED PROCEDURE
The stored procedure used for the scenario is a stored procedure that retrieves a single recipe with the ingredients that are part of the recipe. It also includes the units for each of ingredients used.
For the ADO.NET entity framework to be able to work with the stored procedure, you need to follow some specific rules. Each of the design rules is discussed in the following sections of this post.
Include all columns
When you select an entity from the database you are required to include all columns mapped in the store model part of your entity model. If you don’t map all the columns you will get the following error:
The data reader is incompatible with the specified ‘RecipeBrowserModel.Recipe’. A member of the type, ‘RecipeId’, does not have a corresponding column in the data reader with the same name.
Follow the object graph to fill the children
The second important design rule that you need to keep in mind is to follow a specific pattern to map a specific entity with its children. Although it’s not required to follow this rule, it’s a makes it easier to debug a specific piece of code when you follow a specific pattern.
When mapping an object, you need to start at the root of the object graph and work your way down. At the moment, ADO.NET entity framework doesn’t support mapping a whole object graph, so the mapping is all manual code. To map the object graph in the the example, you will need to follow the pattern displayed in the diagram below. As you can see it’ follows a depth-first approach for mapping the recipe object graph.

The red dots in the diagram show the order in which they are returned by the stored procedure. This order is important later, when you’re going to create the stored procedure mapping as you will need to load the resultsets from the database in that exact order.
The completed stored procedure
In the end, the stored procedure used to select a recipe with its ingredients and categories isn’t all that complicated. The complete stored procedure can be found below.
1: CREATE PROCEDURE SelectRecipeWithIngredients
2: @RecipeId decimal
3: AS
4: BEGIN
5: SET NOCOUNT ON;
6:
7: -- Select the recipe
8: SELECT Recipe.*
9: FROM Recipe
10: WHERE Recipe.RecipeId = @RecipeId
11:
12: -- Select the categories themselves
13: SELECT Category.*
14: FROM Category
15: JOIN RecipeCategory ON RecipeCategory.CategoryId = Category.CategoryId
16: WHERE RecipeCategory.RecipeId = @RecipeId
17:
18: -- Select the ingredient information for the recipe
19: SELECT RecipeIngredient.*
20: FROM RecipeIngredient
21: JOIN Recipe ON Recipe.RecipeId = RecipeIngredient.RecipeId
22: WHERE Recipe.RecipeId = @RecipeId
23:
24: -- Select the ingredients themselves
25: SELECT Ingredient.*
26: FROM Ingredient
27: JOIN RecipeIngredient ON RecipeIngredient.IngredientId = Ingredient.IngredientId
28: JOIN Recipe ON Recipe.RecipeId = RecipeIngredient.RecipeId
29: WHERE Recipe.RecipeId = @RecipeId
30:
31: -- Select the units that are associated with the ingredients
32: SELECT Unit.*
33: FROM Unit
34: JOIN Ingredient ON Ingredient.UnitId = Unit.UnitId
35: JOIN RecipeIngredient ON RecipeIngredient.IngredientId = Ingredient.IngredientId
36: WHERE RecipeIngredient.RecipeId = @RecipeId
37: END
38: GO
MEET THE EF EXTENSIONS PROJECT
The stuff that is part of the entity framework in .NET framework 4 is way better than it was in v3.5, but it’s still not complete. If you are serious about stored procedures, you are going to need to add some extensions to your application that are part of the EF Extensions framework.
You can download the extensions here: http://code.msdn.microsoft.com/EFExtensions
The extensions project contains various components to make working with the entity framework easier. For example the following extensions are available:
- Stored procedure execution customization
- Materialization of arbitrary CLR types given a data reader or DB command.
- Connection lifetime management.
I’m not going to discuss each of these features here. There’s just one feature we need to use for the scenario to work, namely the stored procedure execution customization.
CREATING THE STORED PROCEDURE MAPPING
Normally you would create a new function import on your entity model, but this allows for very little customization. So instead of doing that, I’m going to show you how you can use the EF extensions to map the stored procedure, so that it supports multiple resultsets.
Creating a custom stored procedure mapping starts with creating a partial class definition for theObjectContext. To this context you will need to add a new method that returns the desired entity. In this case the method has to accept a RecipeId of type decimal and will return a single recipe with its child objects.
1: using System;
2: using System.Collections.Generic;
3: using System.Linq;
4: using System.Text;
5: using System.Data.Objects;
6: using Microsoft.Data.Extensions;
7: using System.Data.Common;
8: using System.Data.SqlClient;
9: using System.Data;
10:
11: namespace StoredProcWithMultipleResultSetsSample
12: {
13: public partial class RecipeBrowserEntities : ObjectContext
14: {
15: public Recipe GetRecipeWithIngredients(decimal recipeId)
16: {
17: Recipe result = null;
18:
19: //TODO: Implement this method
20:
21: return result;
22: }
23: }
24: }
Next is the stored procedure mapping itself. You can get a hold of a stored procedure using theCreateStoreCommand extension method that is exposed when you add a using statement for theMicrosoft.Data.Extensions namespace. The result of the CreateStoreCommand method is aDbCommand that you can execute.
1: public Recipe GetRecipeWithIngredients(decimal recipeId)
2: {
3: Recipe result = null;
4:
5: SqlParameter recipeIdParameter = new SqlParameter
6: {
7: ParameterName = "@RecipeId",
8: DbType = System.Data.DbType.Decimal,
9: Value = recipeId
10: };
11:
12: DbCommand cmd = this.CreateStoreCommand("SelectRecipeWithIngredients",
13: CommandType.StoredProcedure, recipeIdParameter);
14:
15: // Use a connection scope to manage the lifetime of the connection
16: using(var connectionScope = cmd.Connection.CreateConnectionScope())
17: {
18: using(var reader = cmd.ExecuteReader())
19: {
20: //TODO: Materialize the recipe.
21: }
22: }
23:
24: return result;
25: }
Once you have the DbCommand you can execute it and materialize the results. I’m using aConnectionScope to manage the lifecycle of the connection. The using statement ensures that the connection is properly closed when the resultsets have been processed. Normally you would do this kind of operation if you were using SqlConnection or any other DbConnection class. When working with the ADO.NET entity framework however, this will be managed for you and this is just a trick to prevent problems with the framework not being able to do its job when it comes to connection management.
The final step to retrieve the data returned by the stored procedure, is to iterate over the resultsets and materialize them.
1: public Recipe GetRecipeWithIngredients(decimal recipeId)
2: {
3: Recipe result = null;
4:
5: SqlParameter recipeIdParameter = new SqlParameter
6: {
7: ParameterName = "@RecipeId",
8: DbType = System.Data.DbType.Decimal,
9: Value = recipeId
10: };
11:
12: DbCommand cmd = this.CreateStoreCommand("SelectRecipeWithIngredients",
13: CommandType.StoredProcedure, recipeIdParameter);
14:
15: // Use a connection scope to manage the lifetime of the connection
16: using(var connectionScope = cmd.Connection.CreateConnectionScope())
17: {
18: using(var reader = cmd.ExecuteReader())
19: {
20: // Materialize the recipe.
21: result = reader.Materialize<Recipe>().Bind(this.Recipes).FirstOrDefault();
22:
23: if(result != null)
24: {
25: // Move on to the categories resultset and attach it to the recipe.
26: // Also bind it to the datacontext, so the object tracking works correctly.
27: reader.NextResult();
28: result.Categories.Attach(reader.Materialize<Category>().Bind(this.Categories));
29:
30: // Materialize the recipe ingredient information and attach it to the recipe.
31: // Also bind it to the datacontext, so the object tracking works correctly.
32: reader.NextResult();
33: result.RecipeIngredients.Attach(reader.Materialize<RecipeIngredient>().Bind(this.RecipeIngredients));
34:
35: // Materialize the ingredients and attach them to the datacontext to enable object tracking.
36: reader.NextResult();
37: var ingredients = reader.Materialize<Ingredient>().Bind(this.Ingredients);
38:
39: // Iterate over the ingredient information
40: // and attach the ingredients to the records
41: foreach(var item in result.RecipeIngredients)
42: {
43: // Attach the related ingredient to the ingredient reference property
44: item.IngredientReference.Attach(ingredients.FirstOrDefault(
45: ingredient => ingredient.IngredientId == item.IngredientId));
46: }
47:
48: reader.NextResult();
49: var units = reader.Materialize<Unit>().Bind(this.Units);
50:
51: // Iterate over the ingredients in the recipe and attach the related unit information
52: foreach(var ingredient in result.RecipeIngredients.Select(item => item.Ingredient))
53: {
54: // Attach the related unit to the unit reference property
55: ingredient.UnitReference.Attach(units.FirstOrDefault(unit => unit.UnitId == ingredient.UnitId));
56: }
57: }
58: }
59: }
60:
61: return result;
62: }
You can materialize a resultset by invoking the Materialize<T> method on the datareader. This will read the whole resultset and convert it into entities.
Although not required, it’s a good idea to bind the materialized entities to the ObjectContext. This enables the ObjectContext to perform object tracking on them, thus supporting update and delete scenarios. You can bind the entities using the Bind extension method to a specific EntitySet<T> object on the ObjectContext.
When you look at the previous code snippet, you will notice that I’m using a bunch of Attach calls. This is done so that I can link the child objects to their parents. You can use the Attach method on anEntitySet<T> object to attach multiple objects to it. Attaching two objects that are part of a many-to-one or a one-to-one relation is done by calling the Attach method on the …Reference properties that you can find on the various entities in your entity model.
THE END RESULT
When you execute the GetRecipeWithIngredients method you will end up with a complete object graph of a single recipe. In this case the “Chicken in the basket” recipe.

CONCLUSION
The combination stored procedures and the ADO.NET entity framework still isn’t a very happy marriage. Although it’s much better than with the previous version. There’s especially much to gain the field stored procedures that return multiple resultsets. It’s just too much work to write all the mapping code even with the help of the the Materialize<T> method.
At least I hope this post helps to give you an idea how you can use stored procedures that return multiple resultsets in combination with the ADO.NET entity framework.
Subscribe to:
Posts (Atom)